Kemal Akay

Yurtdışındaki Video Oyun Sektöründe Çalışmaya Nasıl Başladım?

Game, Genel

Yorum Yapılmamış


Share this post

Ortaokuldayken oyun yapma hevesimden sınıf arkadaşlarıma söz ettiğimde aralarında “Oyun yapmak zor iş Kemal boş ver, gel websitesi yapalım daha kolay“ diyenler vardı. 10 milyon nüfuslu İsveç; Minecraft, Wolfenstein, Need for Speed, Battlefield, Star Wars, The Division, Candy Crush gibi oyunlar üretirken 80 milyon nüfuslu Türkiye’deki ortaokul öğrencilerinin oyun yapma hayali bile kuramaması maalesef üzücü. Neyseki gelişen internet ve yazılım teknolojileri sayesinde son dönemde Türkiye’de de ümit verici gelişmeler oluyor.

2016 yılında Danimarka’nın Kopenhag şehrinde Unity Technologies’te çalışmaya başladığımdan beri bana Türkiye’deki gençler tarafından sorulan en sık sorular “Yurtdışındaki oyun sektörüne nasıl girebilirim?“, “Yurtdışında yaşayabilmek ve çalışmak için ne yapmam gerekiyor?“, “Oyun sektörüne girebilmek için kendimi nasıl geliştirebilirim?“

Bu blog yazısında kendi deneyimlerimden yola çıkarak yurtdışında çalışmak isteyen kişilerin yoluna biraz ışık tutmak istiyorum: Peki ya ben ne gibi deneyimlere sahibim?

2016 yılından beri kariyerimi profesyonel anlamda geliştirmek için pek çok fırsatım oldu. 2 yıl Unity’nin Işıklandırma departmanında grafik test mühendisi olarak çalıştıktan sonra 2018-2020 yılları arasında İsveç’in Göteborg şehrinde Electronic Arts (EA) Ghost Games firmasında çalıştım. Need for Speed: Heat’in UI (User Interface/Arayüz) ekibinde teknik sanatçı olarak yer aldım. Nisan 2020’den beri Battlefield, Mirror’s Edge ve Star Wars: Battlefront serilerini geliştiren Stockholm’deki EA DICE firmasında teknik deneyim tasarımcısı pozisyonunda çalışıyorum.
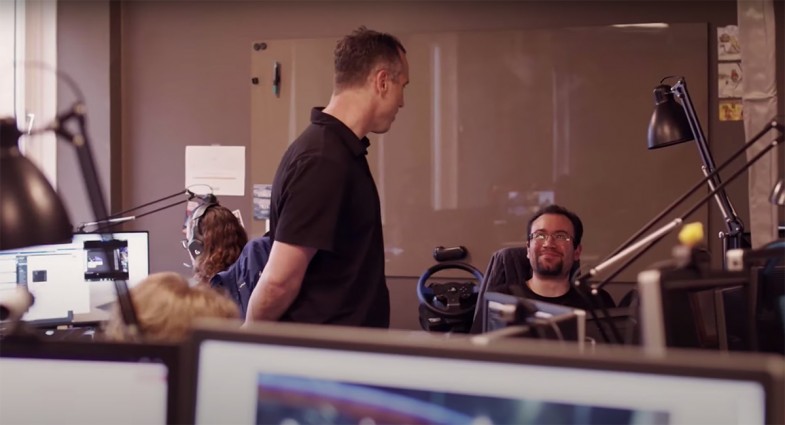
Electronic Arts Ghost Games'te NFS: Heat'in Kreatif Direktörü Riley Cooper ile sohbet ederken (Göteborg)

Electronic Arts Ghost Games'te NFS: Heat'in Kreatif Direktörü Riley Cooper ile sohbet ederken (Göteborg)

Çocukken biraz daha farklı hedeflerim olsa da 2005 yılından beri kariyer hedefim her zaman oyun sektöründe çalışmaya yönelik oldu. Söyleşilere veya podcast’lere katıldığımda sorulan sık sorulardan biri “Gençlere kariyerleri için ne tavsiye edersin?“ oluyor. Bana her sorulduğunda dile getirdiğim bir söz var. Montaigne, “Rotası olmayan bir gemiye hiçbir rüzgar yardım edemez“ der. Stephen R. Covey’nin yazdığı Etkili İnsanların 7 Alışkanlığı adlı kitabında da bahsettiği ikinci alışkanlık “Sonu düşünerek başlayın“dır. Gelecekte kendinizi nerede görmek istediğinizi düşünün ve o hedefe yönelik çalışın. Şu anda olmak istediğiniz pozisyonda mısınız? İleride nasıl hatırlanmak istiyorsunuz?

Kişisel olarak hayattaki en büyük şanslarımdan beri küçük yaştan itibaren “büyüyünce“ ne yapmak istediğimi bilmek oldu. 2007 yılında lise hazırlıktayken kendime hayali bir CV hazırlamıştım ve bu kurgusal CV’ye göre 2018 yılında hayalim Electronic Arts firmasında çalışmaya başlamaktı. Pozisyonum bu CV’de belirttiğimden farklı olsa da yukarıdaki fotoğrafta görebileceğiniz gibi 2018 yılında Electronic Arts’ta çalışmaya başladım, 11 yıllık hayalim gerçek olmuştu.

Peki neye göre bu CV’yi hazırlamıştım?

Lisedeyken alışkanlıklarımdan biri oynadığım oyunların jeneriklerini izlemekti ve oynadığım yabancı oyunların jeneriklerinde acaba Türkiye’den biri var mı diye hepsini okurdum (aynısını Hollywood filmleri için yapardım, özel efekt departmanın jeneriklerini okurdum). O dönem Yerli kardeşlerin Crysis ile olan başarısı benim için ilham olmuştu. Ancak Crysis’i geliştiren Yerli kardeşler küçük yaştan itibaren zaten Almanya’da yetiştiği için onlar bana uzak bir örnekti. Bana asıl ilham kaynağı olan kişi 2007 yılında yayımlanan Call of Duty 4: Modern Warfare’ın geliştirici ekibi Infinity Ward’da Environment Artist olarak çalışan Sami Onur’du.

Sami Onur, o dönem ulaşmaya çalışıp bana cevap veren nadir isimlerden biriydi. 3D tasarım yapmaya başladığım bu dönemde etrafımda bana geribildirim verebilen çok fazla kişi yoktu. Alanında uzman biri olarak Sami Onur ile iletişime geçebilmek benim için çok değerliydi ve onun değerli tavsiyeleri kariyerimi şekillendirecekti. Kurgusal CV’m, genel hatlarıyla Sami Onur’un CV’sinden esinlenmeydi.

Bireysel tavsiyeleri haricinde Sami Onur, somut bir örnek olarak bana yurtdışına açılabilmek için izlenebilecek yollardan birini de gösterdi: Eğitimini yurtdışında yapmak. Kendisi İTÜ’de Mimarlık lisansını tamamladıktan sonra yüksek lisansını yurtdışında yapmıştı ve bu sayede Amerika’daki firmalarla daha kolay iletişim kurmuştu. İlerleyen yıllarda Sami Onur gibi başka örneklere de rastlayacaktım. Giray Özil, Cem Yüksel, Ulaş Karademir gibi alanında çok başarılı ve önemli başka isimler de eğitim için yurtdışına gidip ertesinde o ülkede çalışmaya başlayan kişiler.

Biraz sonra bu yazıda ele alacağımız gibi yurtdışında çalışabilmek için birçok farklı seçenek mevcut ve herkesin kendine has bir hikayesi var. Bu seçenekler arasında en “kolayı“ eğitim için yurtdışına gitmek. Ben de eğitim vesilesiyle yurtdışı maceralarına başlayan kişilerden biriyim.

Yurtdışında eğitim

Kulağa basit geliyor, değil mi? Yurtdışındaki bir üniversiteye başvurun, kabülünüzü alın et voilà!

İşin aslı o kadar basit değil tabii ki. Başvurduğunuz bölüme göre birçok döküman hazırlamanız gerekiyor. Not ortalamanızın yüksek olması, okuduğunuz bölümün yurtdışında geçerliliği ve denkliği olması, portfolyonuz, yabancı dil yeterliliği ve motivasyon mektubu gibi birçok farklı değerlendirme kriteri var. Bunların haricinde Amerika’da veya İngiltere’de okumak istiyorsanız buradaki üniversitelerin çoğunun paralı olduğunu hatırlatmakta fayda var. Diğer birçok Avrupa Birliği ülkesinde de devlet okuluna başvursanız bile bu okullar genellikle Avrupa Birliği dışındaki öğrenciler için paralı – Türk olmanın başka bir avantajı (!!!).

Bu aşamada ekonomik nedenler yurtdışına gitmenize engel olabilir. Türkiye’den olup yurtdışında başarılı olan birçok örneğe baktığınızda zamanında ailelerinin destek verdiğini de görebilirsiniz. Alternatiflerden birisi tabii ki burs almak. Ancak bir üniversiteden burs alabilmek için o üniversitenin belirlediği değerlendirme kriterlerinin üstünde bir başarıya sahip olmanız gerekiyor.

Yazının başında Montaigne’den alıntı yaptım ve ben şu ana kadar bireysel olarak hayatımı o prensip doğrultusunda yaşamaya çalıştığımı belirttim.

Notre Dame de Sion Fransız Lisesi’nde okurken okuduğum okulun bana kazandırdığı en önemli alışkanlıklardan biri okuma ve yazma becerisiydi. Liseden önce kitap okumaktan hiç hoşlanmazdım ama okuldaki müfredat bu alışkanlığımı değiştirdi. Aynı zamanda lisedeki hocalarım sayesinde sosyal bilimlere ilgi duymaya başladım ve o dönem merak ettiğim konulardan biri video oyunlarının ve sosyal bilimlerin kesişim alanlarıydı.

Tam bu dönemde yani 2008 yılında Mutlu Binark’ın ve Günseli Bayraktutan’ın yazdığı Kültür Endüstrisi Ürünü olarak Dijital Oyun adlı kitabı okuma fırsatım oldu. İlk defa bu kitap sayesinde video oyun akademisinden ve oyun literatüründen haberim oldu. Yine ilk kez bu kitapta IT University of Copenhagen (ITU) adlı kurumu öğrendim. ITU, ludolojinin ve game jam kültürünün başladığı kurum. Henüz 2008 yılında lise ikide eğitim görürken okumak istediğim kurumlardan biriydi ITU ve 2014 yılında üniversite eğitimimin son senesinde yüksek lisans için başvurduğum tek okul IT University of Copenhagen oldu. Nisan 2014’te başvurum kabul edildi ve Danimarka devletinden burs kazandım.

Danimarka’da burslu okuduğumu söylediğimde genellikle sorulan soru ‘TÜBİTAK bursu mu?’ oluyor. Hayır dediğimde ise genellikle Danimarka devletinden nasıl burs aldığım soruluyor. Her ülkenin ve üniversitenin farklı koşulları var fakat Danimarka’da burs almak için siz ayrıca başvuramıyorsunuz. Başvurunuza göre okul sadece en başarılı öğrencilere burs hakkı sunuyor. Danimarka’da aldığınız burs bütün okul ücretini karşılıyor ve kısmi yaşama için de aylık burs bağlıyor.

IT University of Copenhagen’ın beni bursla kabul etmesinin şüphesiz birkaç sebebi vardı. 4 senelik Kadir Has Üniversitesi Görsel İletişim Tasarımı bölümünü 3 senede bölüm birincisi olarak tamamladım. Bir sene erken mezun olmamın elbette bir önemi vardı (erken bitirebilmek için yaz okullarında ders aldım). Bunun haricinde en büyük rol oynayan kriter lisede oyun programlama üzerine kitap yazmış olmamdı. Bu kitap daha sonra bazı üniversitelerin seçmeli oyun programlama derslerinin müfredatında kaynak kitap olarak da kullanıldı.

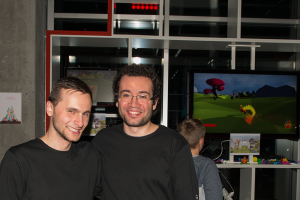
Kopenhag'taki Kulturnatten etkinliğinde oyunumuzu sergilerken

Kopenhag'taki Kulturnatten etkinliğinde Ustrina adlı oyunumuzu sergilerken

Yabancı Şirketlerin Tercih Kriterleri

Yurtdışında eğitim yapmanın en büyük avantajı, öğrenciyken o ülkenin sistemine giriş yapabiliyor olmanız. Sosyal güvenlik numarası almak ve orada yaşamak, o bölgede bulunan şirketler ile iletişime geçebilmeniz için çok büyük fırsatlar sunuyor.

Devam etmeden önce yurtdışında çalışmak isteyen herkese şunu hatırlatmak istiyorum. Yabancı ülkelerde bulunan şirketler, eleman ararken her zaman o ülkede bulunan kişilere öncelik tanıyacaktır. Yurtdışından birisi getirtmenin beraberinde taşıdığı birçok problem var. Sisteme girebilmek, o bölgede yeni bir ev bulmak gibi unsurlar şirketler üzerinde büyük bir yük oluşturuyor. Üstelik size yaptıkları bu yatırımı geri alıp alamayacakları bir risk. Ya bu ülkeye göçtüğünüzde bekledikleri performansı sergileyemezseniz ne olacak? Şirketler bu tarz riskleri mümkün olduğunca azaltmak istiyor, bu yüzden halihazırda o bölgede yaşayan adayları tercih ediyorlar.

Bir şirketin yabancı adayları değerlendirmesi için aradıkları pozisyondaki kişinin o bölgede yaşamaması gerekiyor. Öyle olduğu zaman bile her zaman öncelikli olarak Avrupa Birliği vatandaşları tercih edilecektir (bu Avrupa ülkeleri için geçerli). Türkiye’de yaşayan birinin tercih edilebilmesi için o adayın gerçekten kendini bu alanda ispatlamış olması ve şirketin o pozisyon için aranan kişiyi ne yerel bölgeden ne de Avrupa Birliği’nden bulamamış gerekiyor. Bu da bizi bir sonraki konumuza taşıyor:

Ayrıcalıklı düzeyde yeteneğe ve/veya deneyime sahip olmak

Eğer eğitim yoluyla yurtdışına çıkabilmek sizin için bir seçenek değilse o zaman belki Türkiye’deki çalışma kariyerinize odaklanarak bu süreci hızlandırabilirsiniz.

Çevremde bu yolla yurtdışına çıkabilmeyi başarmış birkaç örnek mevcut. Belki de beklendik bir şekilde bu kişilerin çoğu daha önce uluslararası düzeyde marka bilinirliğine sahip firmalarda çalışmış kişiler. Maalesef Türkiye’deki oyun sektörü özelinde bu tarz firmaların sayısı çok az. Ancak son dönemde bazı firmalar büyük başarılar elde etti. Bunun en bilinen örneği, Peak Games’in Amerikalı Zynga firması tarafından 1.8 milyar dolara satın alınması. Buna benzer olarak Gram Games, Rollic Games gibi mobil oyun firmaları da çok büyük meblağlara yurtdışındaki firmalara satıldı ve bu tarz firmalar daha fazla uluslararası üne kavuştu.

Mobil haricinde PC platformundaki başarılı firmalardan birisi ise Mount & Blade serisini geliştiren Ankara’daki TaleWorlds firması. TaleWorlds, bir kuluçka merkezi işlevi görerek Türkiye’nin oyun sektöründeki nitelikli işgücünün gelişmesine büyük katkılarda bulunan bir firma. Öyle ki TaleWorlds, başarısı sayesinde yurtdışındaki yabancılar tarafından bile ilgi gören bir firma (yurtdışından gelip bu şirkette çalışan kişiler mevcut) ve bu firmada yetişip Playstation, Ubisoft gibi büyük ve başarılı firmalarda çalışmaya başlayan kişiler mevcut. Serdar Koçdemir, TaleWorlds’te yetişmiş ve şu an Sony Playstation’ının Grafik Mühendisliği departmanında müdür olarak çalışan bir yazılım mühendisi. Benzer bir şekilde Bahar Şevket, TaleWorlds’ten sonra Ubisoft’ta oyun programcısı olarak çalışmaya başlamış bir yazılımcı. Şimdi ise İsveç’teki Paradox Interactive firmasında çalışıyor (kendisiyle burada röportaj yapmıştım).

Aynı şekilde Peak Games firmasında yetişip yurtdışına çıkan birkaç isim de mevcut. Üniversitede okurken Peak Games’te çalışan iki kişiyle röportaj yapmıştım. Bunlardan ilki Keykan Sönmez’di ve kendisi daha sonra Almanya’da çalışmaya başladı. Bir diğer isim ise Osman Faruk Küçükerdem. Kendisi daha sonra San Francisco’ya yerleşti ve 2019’da kendi firmasını kurdu. Osman Faruk Küçükerdem ile 2012 yılında yaptığım röportaja buradan erişebilirsiniz.

Uluslararası bilinirliğe sahip büyük firmalarda çalışmanın bir avantajı da ekip olarak çalışma deneyimi. Bu firmalarda çalışmanız, iyi bir ekip oyuncusu olduğunuzu kanıtlayabilmenizi sağlıyor. Bu da yurtdışındaki firmalar için en az bireysel becerileriniz kadar önemli.

Bunlar haricinde çok ayrıcalıklı bir yeteneğe sahip olarak yurtdışına çıkabilmeniz mümkün. Ben lisede okurken Cemre Özkurt, Emrah Elmaslı gibi sanatçıların ürettiği çalışmalar sektöre damgasını vuran eserlerdi. Bu yüzden bu gibi isimlerin Amerika’da ve İngiltere’de iş bulması çok da zor olmuyor. Tek yapmanız gereken sadece Türkiye’de değil, küresel olarak sektöre damga vurmanız ;)

Network bağlantılarına sahip olmak

Tüm bunların haricinde, benim gözlemlerime göre, üçüncü bir seçenek de mevcut. Bizim Türkçe’de ‘tanıdık vasıtasıyla’ dediğimiz, ecnebilerin ‘networking’ olarak adlandırdığı olay. Tanıdık olayının ‘torpil’den farklı olduğunun altını özellikle çizmek istiyorum. Birisini tanımanız, çalışmak istediğiniz şirket ile olan diyaloğun daha kolay başlamasını sağlayabilir. Ancak bu sizin direkt işe alınacağınız anlamına gelmiyor. Aksine performansınız yine değerlendirilecektir ama bir şirkette çalışan kişinin verdiği ‘referans’, süreci sizin için kolaylaştıracaktır. İki bölüm önce şirketlerin mümkün olduğunca yeni eleman alım sürecinde riski azaltmaya çalıştığını söylemiştik. Halihazırda bir şirkette çalışan kişinin verdiği referans, o şirketin size karşı daha güvenle bakmasını sağlayacaktır.

Bu bölüm için spesifik örnekler vermeyeceğim fakat çevremden bu vesileyle Türkiye’den yurtdışına açılma fırsatı gördüğüm birkaç örnek oldu. Kişisel olarak kariyerimde ben de ‘networking’in faydasını gördüğümü söyleyebilirim. İnsanlar, özünde sosyal varlıklar ve insan ilişkileri her zaman önemli. Dolayısıyla ilgi duyduğunuz alandaki etkinliklere katılmak, o etkinliklerde profesyonel kişilerle tanışmak ve iletişim kurmak size kariyerinizde her zaman olumlu olarak geri dönüş sağlayacak kazanımlardır. Benzer durum üniversitede diğer öğrenci arkadaşlarınızla ve hocalarınızla kurduğunuz ilişkiler için de geçerli. Üniversiteden tanıdığınız bir hoca ileride kendi şirketini kurabilir ve size bir kariyer fırsatı sunabilir. Bu yüzden kurduğunuz insan ilişkileri kariyeriniz için her zaman önemli.

Sonuç

Yazıda birkaç kez belirttiğim gibi herkesin yurtdışına çıkma serüveni farklı ve bu süreçte şans her zaman bir faktör. Türkçe’de ‘yıldızların uyuşması’ deriz ve gerçekten bazı fırsatlar için doğru yerde ve doğru zamanda olmak gerekiyor. Maalesef bazı durumlarda ne kadar başarılı olursanız olun, her şey sizin kontrolünüzde olmuyor (üniversitede okurken bir hocam San Francisco’daki bir şirkete olan başvurusunun kabul edildiğini ama 2008 ekonomik krizi yüzünden bu sürecin iptal olduğunu anlatmıştı).

Ancak yazının başında da vurguladığım gibi önemli olan sizin kendi becerilerinize ve yapabileceklerinize odaklanmanız. Kendinize somut hedefler koyun ve bu doğrultuda ilerleyin. Başarı bir gecede elde edilmiyor. Başarı, uzun soluklu bir yolculuğun sonucu. Öncelikle kendinizi iyi tanıyın. Hayatta gerçekten ne yapmaktan hoşlandığınızı öğrenin. İlgi alanlarınızı, heveslerinizi keşfedin. Ve kendinizin rakibi olun, kendinizi başkalarıyla kıyaslamaktan vazgeçin. Elon Musk gibi biri yaşarken her zaman sizden daha iyileri olacak.

Bu yazıyla genel olarak bana sorulan sorulara kişisel olarak elde ettiğim deneyimlerden yola çıkarak cevap vermek ve yurtdışı serüvenlerimi özetlemek istedim. Burada yazılanların haricinde bana sormak istediğiniz sorular varsa bana buradan ulaşabilirsiniz. Vaktim olduğu zaman herkese elimden geldiğince yardımcı olmaya çalışıyorum.

Serüveninizde başarılar!
Read more

GPU Lightmapper Preview

Unity3D

Yorum Yapılmamış


Share this post


Our GPU Lightmapper pre-alpha preview video got more than 15K views in a week! That simply proves how important it is for many people. Lighting team is working hard to deliver this exciting feature at its best. For this video, I was responsible for the scene and lighting setup and video editing.

Read more

Hofburg Palace

Photography

Yorum Yapılmamış


Share this post

Recently finished merging process of photos taken in front of Hofburg palace, former imperial palace in the centre of Vienna, Austria

Read more

Mixed Lighting in Unity 2017.1 – Switching between Distance Shadowmask and Shadowmask at run-time

Unity3D

1 Yorum


Share this post

In theory, it’s all good but how about using these concepts in practise? In this tutorial, we will examine a realistic use case to see how shadowmask feature can be used in a simple game scene. The scene setup will include an in-door environment and out-door environment. In-door section will use Shadowmask mode and out-door will use Distance Shadowmask mode for shadows. The scene will be very basic in order to explain how the feature can be implemented and before diving into details, let’s take a look at the overview of what we will be learning:

  • Scene setup and lighting parameters
  • Switching between Shadowmask and Distance Shadowmask via API
  • Making local changes in lightmap parameters to get rid of banding artifacts (for soft shadows)
  • Quick look at other post-processing effects for polishing

We’ll start our tutorial by adjusting the lighting parameters. For the purpose of this meaningful iteration times, we will initially dial down the default parameters. Otherwise settings can easily become an overkill even with default settings. Once we are done, we can adjust the parameters again for high quality.

You can download the necessary files for the tutorial here. You can also download the PDF version of the tutorial here.

Scene setup and lighting parameters

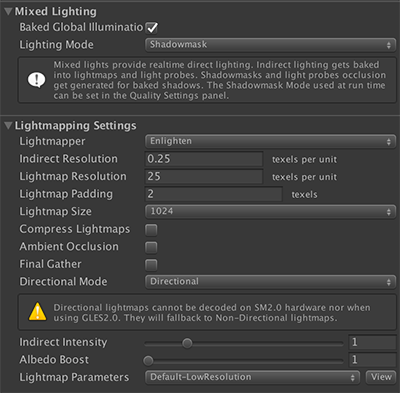
First of all, we will disable Realtime Global Illumination, we don’t need it for this tutorial. But we’ll use Baked Global Illumination and keep Shadowmask mode for lighting mode. Secondly, we will dial the indirect resolution all the way down to 0.2 and set lightmap resolution to 15. Finally, we will change Lightmap Parameters from Default-Medium to Default-Low Resolution. These settings will create some unwanted artifacts and low resolution results but in order to iterate over our scene lighting fastly, we will use these settings. Otherwise we can end up waiting for hours whenever we make a tiny change in the scene.

Next step is optional and it depends on your computer setup. By default, Auto mode is enabled in Lighting Window and it is usually useful when you’re working with a small scene. But as soon as you start to have large scenes, every tiny change you make in the scene view triggers lighting generation and slows down the editor, thus sometimes render you incapable of editing the scene. Therefore I usually disable it, make my changes and build the lighting when I’m done, after evaluating the last result. But feel free to use either approaches.

For the color space, we will use Linear space to have more accurate and deterministic colors and deferred as the rendering path. These settings are used by high-end games and in fact, if you want to have correct reflections using reflection probes and SSR, then you have to use deferred path. Currently, SSR is not supported in forward mode and reflection probes don’t display proportionally correct results unless you use deferred. With the deprecation of Directional Specular in Unity, the recommended solution is to use reflection probes and SSR. So reflections will play an important role in our scene setup, therefore we will switch to deferred rendering path.

Next, when we check the objects in our scene, we have a playable character, outdoor environment, indoor environment, colliders, sun blockers and lighting related objects.

For every type of object, I have created a new layer. Colliders are used to constrain the playable area of the level, sun blockers are used to manipulate the shadows but they are invisible to main camera. The reason why we use them is due to lac of backfaces. The geometry we use for the interior don’t have any backfaces so they don’t work as occluders and light can leak through. And since they are not rendered on the screen, we use really low quality settings for these objects. And trust me, this technique is also used in real-life production environment (well, maybe not so roughly as we do it here ;) .

For the lighting, we use four different object types: A directional light, environmental lighting, reflection probes and light probes. For the sake of simplicity, we will use only one directional light as authoring artistic lighting is beyond the scope of this tutorial, we are only focusing on the technical side of shadowmask feature. And it can be tedious to setup light probes and reflection probes correctly, this is also commonly misunderstood by beginner users. Hence, we will analyse the correct approach for light probes and reflection probes. We will benefit from the new light explorer while doing the setup.

One more important point is ambient lighting. For this, we simply assign our skybox shader as part of the environmental lighting (it can be found as an asset in the project). If you examine this skybox material, you will see that it is a sIBL HDR and especially for outdoor scenes, HDR images are very helpful and provide detailed BRDF information that would otherwise be costly to recreate.

Finally, we have a character from Unity Standard Assets and a custom camera script with custom post processing and animation components attached to it.

Switching between Shadowmask and Distance Shadowmask

As explained in the previous section, we will switch the light mode from Shadowmask to Distance Shadowmask when the character goes out and vice-versa. This way, we can keep baked soft shadows in the interior environment and switch to sharp realtime shadows in the exterior environment. And perhaps to your surprise, this is very trivial. Simply, copy the script below and add it to a trigger:

Easy, right?

Making local changes in lightmap parameters

The default settings used in Unity are close to samples of a high quality project. And as explained at the beginning of the post, this can drastically increase the rendering time for large scene setups, therefore we need to adjust our settings.

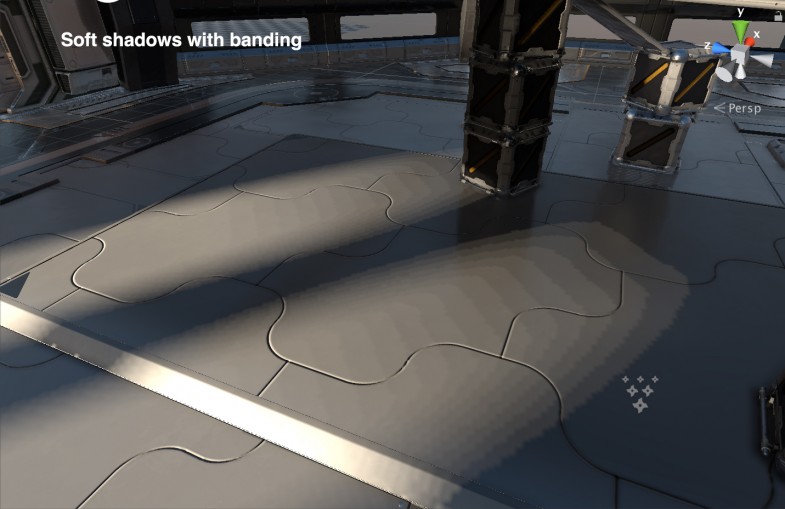
For iteration purposes, we lower the parameters but what if even default settings don’t work? In the context of shadowmask, this can typically become a problem with soft shadows. Below, you’re seeing such a case:

So how can we resolve this problem? Increase the lightmap resolution, maybe lightmap size?

Besides the lighting window, we can also tweak the parameters for specific objects. Remember that we changed Lightmap Parameters to Default-LowResolution while starting? You can actually assign custom lightmap parameters per instance and overwrite the scene settings.

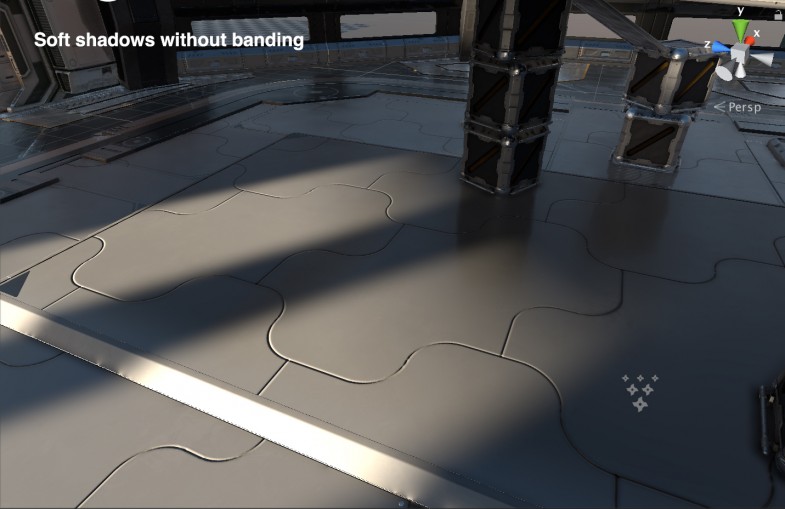
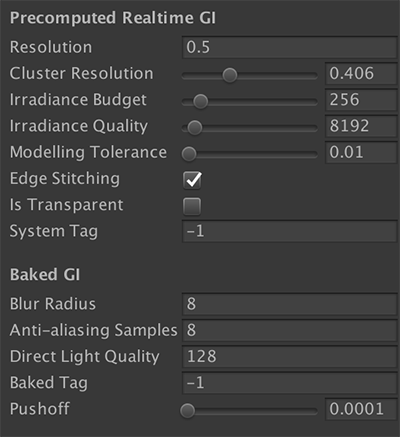
First, I disable “Compress Lightmaps” option in the Lighting Window, then I created a custom lightmap parameter for the plate, and increased Blur Radius to 8 and Direct Light Quality to 128. Now let’s see how the result looks:

Much better, right? Furthermore, I played with Precomputed Realtime GI values for clustering optimization in Enlighten and assigned custom lightmap parameters to different objects in the scene. You can see my settings for the plate below. But the details of these parameters are beyond the scope of this tutorial, therefore we will keep going. You can check Precomputed Realtime GI tutorial in Unity3D website for more information.

Quick look at post-processing effects for polishing

Besides Screen Space Reflections, we also use TAA (Temporal Anti-aliasing), Ambient Occlusion, Color Grading, Chromatic Aberration, Grain and Vignette.

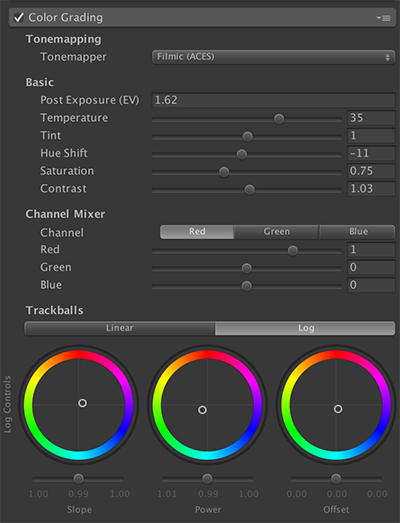
Default values of Ambient Occlusion, Chromatic Aberration, Grain and Vignette are good enough for this scene setup (ok, maybe the radius of AO can be lowered). However, we will do some additional tweaking for TAA and Color Grading.

For Color Grading I used these settings in order to capture a magic hour feeling so the temperature is a bit high, other parameters are tweaked to be complementary and create a contrast with shadows:

TAA, on the other hand, is the industry’s fastest anti-aliasing solution at the moment. There is one drawback: It doesn’t work nicely with transparency and can sometimes be problematic when blending with Ambient Occlusion. Otherwise, it is a very useful effect to apply and it can make a huge difference.

In order to use it, we have to first disable MSAA from Quality Settings. So go to Edit > Project Settings > Quality and find Anti aliasing under Rendering section. Switch it to “Disabled”. Next, we have to disable it on the camera. So select your main camera in hierarchy and in inspector, find “Allow MSAA” option under Camera component. Uncheck it. We can now enable TAA. Choose the post processing profiler and enable Anti-aliasing. Switch to Temporal Anti-aliasing. You can increase spread value to avoid jittering at all cost but as a pro tip, never make it 1.0. Our test results show that ideally, it should be between 0.9 and 0.97 depending on your scene setup.

In the next post, we will explore how to correctly place light probes, reflection probes and use SSR.

Read more

Light Probe Intensity Adjustment Tool for Unity3D

Unity3D

Yorum Yapılmamış


Share this post

Github link

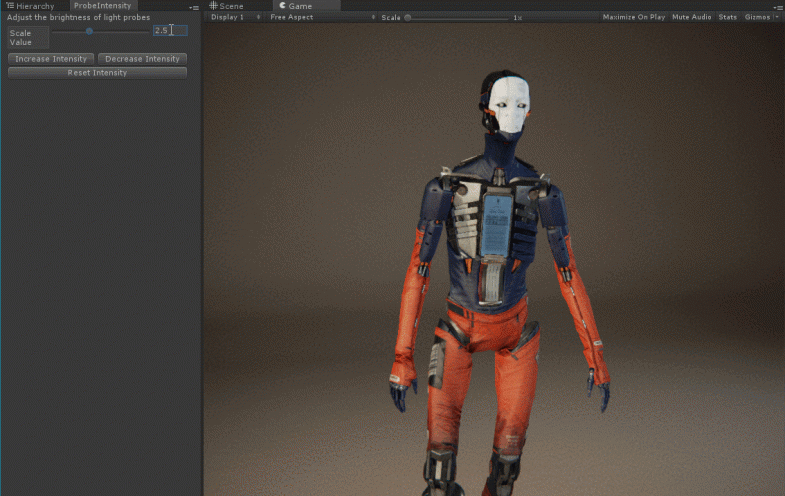
A tool that allows you to change the brightness of your light probes in Unity3D.

Why?

This can be used for adjusting the brightness of your dynamic objects in the scene that sample the lighting through light probes. In addition, there is no need to bake to change intensity, it simply post-processes the present data. By default, it is not possible to change the brightness of light probes in Unity3D. The reason behind this is because SH coefficients [1] of light probes are generated through PBR [2] principles therefore tweaking it can render incorrect results. However, this can become a problem when you are working with unrealistic, cartoony style graphics and in fact, many users requested this feature on Unity forums. This custom script addresses that issue and attempts to resolve this bottleneck. The script can be further developed if there is enough demand from users.

Note that script is only tested in simple scenarios and may not work in certain cases. Use it at your own risk.

How To

  • Drag LightProbeIntensity.cs and .smcrsp files to your project
  • Open Tools > Light Probe Intensity Tool
  • Bake your light probes
  • Adjust the intensity of light probes

Known Issues:

  • Resetting the intensity applies same SH values to all light probes


[1] – In Unity, spherical harmonics are used to store the lighting information in light probes. Find more information about the concept’s theoretical background in this Wikipedia page

[2] – For more details about PBR in Unity, please check this link

Read more

Mixed Lighting in Unity 5.6 (Part II) – Shadowmask and Baked Indirect Modes

Unity3D

Yorum Yapılmamış


Share this post

In the first post, we discussed what mixed mode is and how Subtractive mode works. If you are unfamiliar with mixed lighting, then please take your time to understand the functionality behind it.

The distinct feature of new mixed lighting modes is Shadowmask support. Besides, intensity and directionality maps, Unity can now also generate shadowmasks for all light types. Unlike subtractive mode, shadowmasks can seamlessly mix realtime and baked shadows regardless of the light type. This means we can achieve distant shadows. For performance, we can have nearfield realtime shadows and farfield baked shadows, thus keep lower draw call counts. In contrast to subtractive mode, shadowmask feature can also generate high quality realtime specular. In addition to these rewarding features, UI is improved, refactored and new debug modes are added to facilitate the way you can author your lighting in your scenes.

And here is a video that demonstrate Shadowmask and Distance Shadowmask in use. Precomputed realtime GI is completely disabled for this scene setup.

Now, we already mentioned that subtractive mode is the old mixed mode in Unity. But besides that you will find out there are two new options in the lighting mode menu: Baked indirect and shadowmask. It is important to note that baked indirect and shadowmask are not quality settings. All the modes offer different features and they can all serve useful based on your use case.

Essentially, the key feature of Shadowmask is very simple to understand. It resolves what Subtractive can’t do, which is, in addition to directional light you can use point light and spotlight to mix realtime and baked shadows without double shadowing/lighting therefore it allows a correct composition of overlapping shadows.

Before moving on, we need to define the concept of shadow distance which is tightly related to light modes. Many beginner users don’t know this concept but it is very crucial to grasp it in order to author your scene correctly and efficiently. Otherwise you can easily end up with unnecessary draw calls and drops in frame rates.

Concept of Shadow Distance and Shadow Casters

In Unity, the behaviour of shadows change based on shadow distance and this behaviour also depends on the light mode. A quick way to see your shadow distance is through Shadow Cascades mode. In the scene view, you can select Shadow Cascades mode to visualize the shadow distance. This parameter can be changed in Quality settings. Another way to change shadow distance is through API call but the use cases for changing it are very limited. It can sometimes be useful for edges cases though (e.g. when you need to reduce the shadow distance for a lower draw call in some light modes).

So the behaviour of the shadows can change whether your geometries are within the shadow distance or beyond the shadow distance, and it directly affects the performance.


In fact, if you go to Quality settings (Edit > Project Settings > Quality), you will realize that there are many parameters you can use to adjust your shadow settings. Unfortunately, this is a hidden part in UI and not many users are aware about it unless they specifically search for these parameters when they need it.

In particular, you will see that you can toggle the option for shadowmask between Distance Shadowmask and Shadowmask. By default, Distance Shadowmask option is selected and we will discuss the difference between these modes very soon. Let’s first start with Shadowmask mode itself.

Shadowmask

In Shadowmask mode, static objects receive shadows from other static objects via the shadowmask, regardless of the shadow distance. Shadows from dynamic objects are received via shadow maps only within the shadow distance. Dynamic objects receive shadows from other dynamic objects via shadow maps within the shadow distance. Shadows from static objects can only be received through light probes.

Now, when you are using Shadowmask mode with dynamic objects and lightmap static objects, the first thing you may realize is the inconsistency between dynamic objects’ shadows (shadow maps) and baked shadows from lightmap static objects. Currently (as of 5.6), Unity only supports a simple version of PCF shadows at runtime, which is a simple shadow that can sometimes render artifacts if you get too close. Thus, it is not possible to achieve soft shadows with dynamic objects. On the other hand, it is relatively easy to achieve soft shadows with static objects. In fact, you usually have to increase the resolution to render more pronounced shadows with static objects because you need more texels to define your shadows on a lightmap. Only this way, you can render shadows closer to shadow maps from dynamic objects.

With a high resolution lightmap, you can see that baked shadows from static objects are close to shadow maps from the dynamic object.

With a low resolution lightmap, you can see that baked shadows from static objects are inconsistent with shadow maps from the dynamic object.

A friendly reminder about shadowmask mode: Dynamic objects cast shadow maps only within the shadow distance and none beyond. On the other hand, static objects only cast baked shadows regardless of shadow distance. And both Shadowmask and Distance Shadowmask offer realtime specularity.

This brings us to our next question. What is Distance Shadowmask and how is it different from Shadowmask?

Distance Shadowmask

If you watched the video I shared at the beginning of the post, you have probably realized that regular shadowmask mode offer less draw calls than distance shadowmask mode. Now why is that?

It’s because of the behaviour of Distance Shadowmask based on the shadow distance. Within the shadow distance, both dynamic and static objects are rendered into the shadow map allowing static objects to cast sharp shadows onto dynamic objects. Beyond the shadow distance, static objects receive high quality shadows from other static objects via the precomputed shadowmask, and dynamic objects receive low resolution shadows from static objects via Light Probes and LPPVs.

I think this clarifies how dynamic and static objects cast shadow in Distance Shadowmask mode and why Shadowmask mode is cheapier than Distance Shadowmask. Basically, shadow maps cost more than baked shadows (because they are rendered every frame, whereas baked shadows are stored in a texture/lightmap).

And in Shadowmask mode, dynamic objects cast shadow maps only within shadow distance. Distance Shadowmask is more expensive because static objects can also cast realtime shadow maps within the shadow distance, hence increasing the draw call. That’s why Distance Shadowmask mode is more suitable for high-end PCs, consoles. And as a cheapier solution, shadowmask is recommended for low-end/mid-end devices.

Occlusion in Shadowmask

One more thing I would like to elaborate about Shadowmask feature is how occlusion works for different object types. In the previous post, we talked about why the placement of light probes plays an important role for dynamic objects to receive shadows from static objects. Essentially, dynamic objects need light probes to sample occlusion data from occluders. Therefore, probe occlusion concept from Subtractive mode can be directly applied to Shadowmask and Distance Shadowmask as well.

For a quick reference of how objects receive shadows based on their type and light mode, you can check this Lighting Modes Reference Card. (You can even print and paste it to one of your walls for later reference ;)

Shadowmask as Quality Setting

In Unity 2017.1, Shadowmask and Distance Shadowmask options are moved to Quality Settings, there are two reasons for that.

First, we wanted the users to artistically have more control over the behaviour of shadows so it is possible to change the mode at run-time. For instance, you can use Shadowmask for in-door environment (e.g. to achieve soft shadows in a hangar) and switch to Distance Shadowmask for out-door environment within the same scene. In fact, we will examine how to do this through API in the next post.

Secondly, you can set various requirements for different hardware setups. For example, in a game, it can be exposed to Menu UI in which user can adjust the setting or if you publish your game on Steam, you can rely on the regular Shadowmask for low-end hardwares and use Distance Shadowmask for high-end PCs.

We can do this because technically, it is very easy to switch between Shadowmask and Distance Shadowmask, the only drawback is the amount of draw calls but after all, it is up to user to handle it.

Technical Limitation and Debug Tools

Finally, let’s talk about technical limitations for Shadowmask feature (Shadowmask and Distance Shadowmask) and the debug tools that can help you to diagnose your problems while doing a setup.

Now that you know how and why to use Shadowmask, let’s talk about its limits. So, due to technical constraints, Unity only supports up to four overlapping mixed lights in a scene. If there are more than four mixed lights on the same spot, then one of them falls back to baked. You can usually observe this if one your lights suddenly become overbright. You can instantly sense that there’s something wrong.

Good news is we have a debug visualizer to help you solve your problems. If you switch your scene visualization mode from “Shaded” to “Light Overlap”, you will see that light in question is highlighted as red.

It is worth mentioning that unlike point or spotlight, directional light doesn’t have defined boundries, it’s omni-directional. So you always need to take that into account when debugging your overlapping mixed lights. On the screen, you may just see four overlapping lights but in fact, directional light might be intersecting from elsewhere. This can really be cumbersome if you have more than one directional light to lit your scene (e.g. as fill light) so use it wisely.

Baked Indirect

So far we have covered Subtractive mode, Distance Shadowmask and Shadowmask features. The only remaining mode is now Baked Indirect.

Given the complexity of options in Shadowmask, Baked Indirect mode is fairly easy to understand and that’s why I intentionally left it as the last mode to explain.

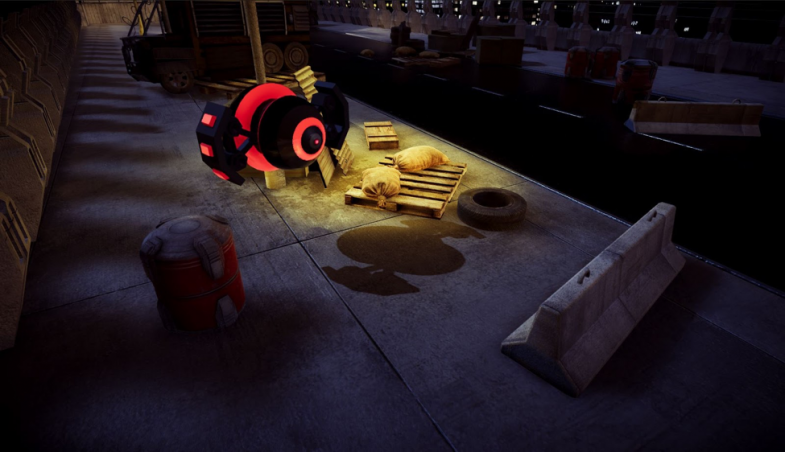
Baked Indirect mode doesn’t use any shadowmasks. That’s why there are no distant shadows in this mode. Within the shadow distance, both static and dynamic objects cast realtime shadow maps. But beyond the shadow distance, there are no shadows. In baked indirect, everything is also in realtime except indirect illumination. This means, you have realtime lights, realtime shadows and realtime specularity but bounce light information is stored in lightmaps and it is static. The things you can do in this mode are limited but you can get creative. Below, you will see how swaying mixed spotlights in baked indirect mode can fake realtime global illumination:

You can see that lights are animated and the intensity of lights flicker. However, if you specifically check the indirect illumination on the streetlight, you can see that it doesn’t change. So technically, you can move your lights but not too much, otherwise you can end up with artifacts. In the video below, you will see how indirect illumination can cause this type of artifacts if you move your objects across the scene:

As you can see, understanding baked indirect mode is much more easy. In the next post, we will see how to use Shadowmask feature in a simple but realistic use case.

Read more

Mixed Lighting in Unity 5.6 (Part I)

Unity3D

10 Yorum


Share this post

In Unity 5, lighting has taken a huge step forward. It is now possible to create highly realistic games. Adam demo is just one of the examples that proves the concept. As mentioned in the first post, however, many games developed by Unity rely on baked lighting, mostly due to performance reasons. But sometimes the use of realtime and baked lighting is necessary and previously, this is where Unity fell short. That is no longer the case. In 5.6, Unity addresses the issues raised by users.

Lighting features can be a mystery for beginner users as lighting UI is not manifested in the editor by default. And our observations showed that almost none of the beginner users have an idea about lightmapping concept. We refactored the UI to make that clear, but simply, some concepts just needs to be learned. In the first part of this serie, I will initially (and briefly) explain the difference between realtime lighting and baked lighting (lightmapping) concepts. Then, I will explain what mixed lighting is (currently, we don’t have any page in the manual that properly explains it). If you are already familiar with these concepts, feel free to jump to part II.

What is Precomputed Realtime GI and Baked GI Lighting?

First of all, new light modes in Unity don’t contribute anything new to precomputed realtime GI lighting, instead it offers new ways for users to apply realtime and baked lighting concurrently in a scene. Realtime lighting is easy to understand. You can just play with your lights and it will instantly update all the lighting in your scene. Easy, right? The only problem is it comes with a cost. Everytime you actively update your lights, it will be expensive in terms of performance. That’s why Unity also has the lightmapping concept. You can bake the lighting and store all the lighting data as lightmaps in your project. It also costs less because essentially, it’s just a texture.

In baked lighting, there is one major difference than realtime lighting: They are all static and you can’t move your lightmap static objects, otherwise they will look fake and wrong. Also, making your gameobjects lightmap static is easy. You just need to mark them as static (or just lightmap static) in the inspector. This will ensure that Unity bakes lightmaps for that object. You don’t need to do this if you want to keep your objects dynamic, by default they are already dynamic.

The detailed description of these concepts are beyond the scope of this post and we already have a great tutorial series in unity3d.com prepared by David Llwelyn and lighting team to explain the optimized techniques to use precomputed realtime GI lighting in Unity.

In addition to that, we recently updated Courtyard demo in AssetStore to make it compatible with the latest stable version of Unity 5.5. You can also check that project to see how you can use realtime lighting in your projects.

Direct and Indirect Lights

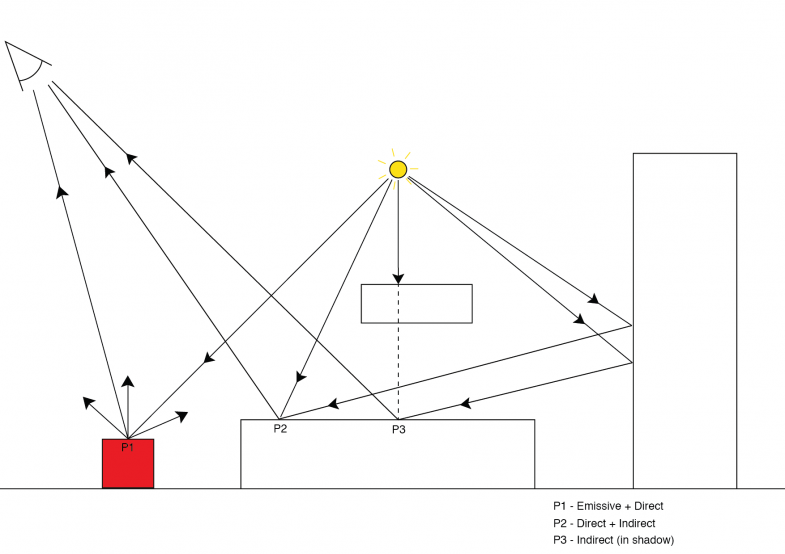
Another important concept that many beginners don’t think about is the difference between direct and indirect lighting. Similar to realtime lighting, direct light concept is fairly easy to understand. It’s the photon rays from a light source that directly affect an object. It’s what you explicitly see.

What is relatively hard to understand is the concept of indirect illumination. Basically, indirect illumination is achieved through bounced lights. Besides the direct lighting, we can also have bounce lighting. The light photons simply bounce around in a scene based on mathematical equations. Following chart and GIF depicts how indirect illumination works:

You can set the indirect contribution of a light through “Bounce Intensity” parameter in the light component. For instance, if you want to disable its indirect contribution, you can simply set it to zero.

So precomputed realtime GI is fun and works perfectly well in Unity. But it’s very expensive and Unity is mostly used by developers who target low end devices (mobile) and requires optimized scene setups due to performance reasons (VR). Then, you’d obviously like to bake all the lighting for your static objects (e.g. environment) and use realtime lighting for your dynamic objects (e.g. characters). So this brings us to next question:

What is Mixed lighting?

The term itself is quite self-explanatory. Mixed lighting allows users to mix realtime and baked lighting. The use case we described above is a typical scenario where most of the games use. In Last of Us, for instance, the environment doesn’t move therefore everything is stored in lightmaps, whereas all the moving objects use realtime lighting.

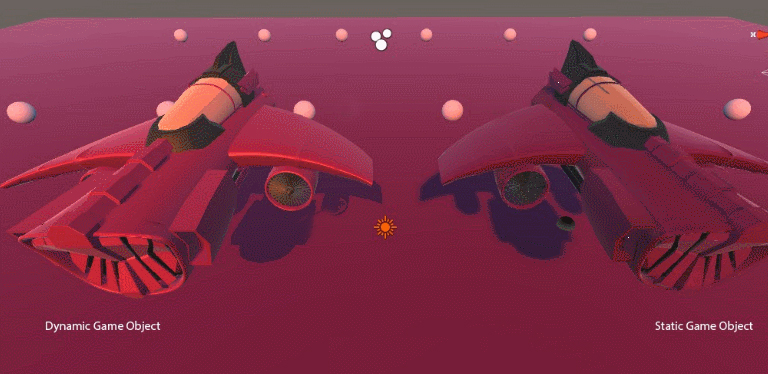
You can think that you can first bake all the environment, and then use realtime lighting for your characters. This, however, introduces a critical problem: All your baked objects will receive the dynamic light as well and this means they will be exposed to double exposure, creating overbrightness for these objects. Of course, you can mask realtime lights for baked objects but then, you can easily end up with discrepancies in terms of brightness values. Following image shows a case that suffers from this issue. Same geometry with the same material applied but one of them is dynamic, other one is static:

This is perhaps acceptable but there are cases where it may definitely hurt some eyes:

So that’s where mixed mode comes in. Ideally, mixed mode takes care of all this hassle for you and illuminates dynamic and static objects within the same balanced range (hence retains visual fidelity and consistency).

In Unity 5.5, you can switch your light type to mixed in inspector in order to use mixed lighting.

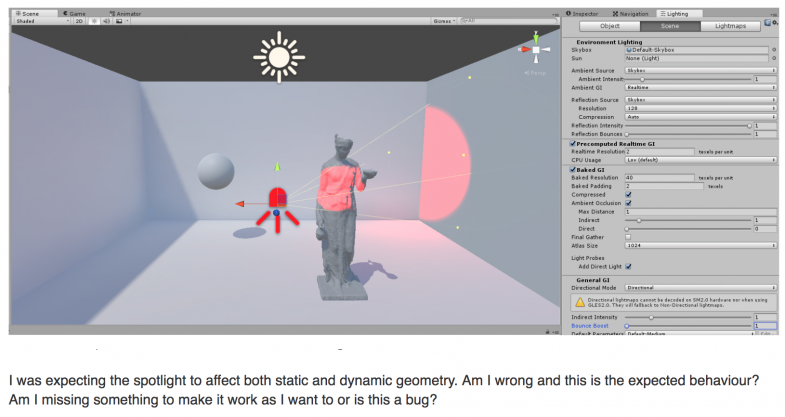
Et voila! You can now safely use mixed lighting for dynamic and static objects. Wait…why my dynamic objects don’t cast any shadows when I use mixed spotlight or point light?

(@caosdoar wondering why mixed spotlight doesn’t cast any shadow in Unity forum)

In fact, there so many other posts and complains about this issue that this is just one of them. But let me put it straight forward: It’s not working because mixed lighting only works with one directional light. Wait, what?

Subtractive Mode

This is the main reason why new light modes are introduced in Unity, basically to address this issue. In total, you will see that there are four light modes you can choose in the lighting window. These are baked indirect, distance shadowmask, shadowmask and subtractive. At the beginning of the post, we mentioned that there are only three new light modes added. This is because subtractive mode is the old mixed mode and we still keep it because it’s cheaper in terms of performance compared to other modes, which still proves that it’s useful when you are developing for, say, mobile.

So let’s rephrase how this mode works with a bit more technical words in Unity: Selecting the ‘Mixed’ baking mode, GameObjects marked as static will store lighting information from mixed light as lightmaps. However, unlike lights marked as ‘Baked’, Mixed lights will also contribute direct light (in realtime) to non-static (dynamic) GameObjects within your scene. Did we mention it only works with a single directional light? Good, because mixed point and spotlight don’t cast any shadow on objects.

In addition, there is one more feature specific to subtractive mode. Unlike other modes, direct light is also baked therefore there is no specularity in this light mode.

Probe Occlusion

In subtractive mode, another important component that must be used for dynamic objects is light probe groups. Without light probes, dynamic objects can’t sample the lighting used for static objects and most notably, they can’t use the occlusion data. So in order to receive shadows, dynamic objects need to blend the lighting from light probes. In the following visuals, you can see how a dynamic object uses light probes for occlusion:

For achieving more precise occlusion, your important objects (e.g. main character) in the scene can have light probe proxy volumes (LPPVs) assigned. Note though, that they come with additional performance cost.

Few words about Color Space and Rendering Path in Subtractive

There is one last thing to mention about Subtractive mode. This mode is designed and kept for forward rendering path and gamma color space. It is not meant to be used for deferred rendering path and linear color space. It is because subtractive mode is relatively cheap compared to other modes and the use of this mode is targeted for low end devices such as mobile platform. For more details about rendering paths and color space, you can find information in the official manual.

In conclusion, we covered how subtractive mode can be used in practise in Unity 5.6. In the next part, we will talk about new light modes (Distance Shadowmask, Shadowmask and Baked Indirect) and how they can be used in your projects.

Read more

New Light Modes in Unity 5.6 Explained

Unity3D

Yorum Yapılmamış


Share this post

PDF Version here

(If you use Chrome, some images of posts aren’t displayed. So use another browser or download the PDF that includes new light modes description)

By the version 5.6.0b2, Unity introduced three new light modes. Internally, we describe these new features as “fixed mixed lighting” and we know that many users were waiting for this “fix”, because from a user’s perspective, mixed lighting in Unity was broken.

Reading through the comments posted by users on forum allows us to receive feedback and see how beginner and advanced users approach this feature. It is worth mentioning that we also provided a detailed manual about how each light mode works from day one. You can access the forum post here.

So why bother to write this blog post? Lighting can be a challenging subject, especially when it comes to beginners. By default, lighting window is hidden in the editor and unless you open it from (Window > Lighting), all the settings are a black box to user. And if you are a beginner user or a 2d game developer/artist, there is no need to adjust the parameters. Unity can automatically take care of all the work for you.


However, if you are 3d game programmer/artist, then it’s just a different story. Having background in offline renderers myself, we should emphasize that using realtime lighting techniques can be a completely different matter of subject compared to offline raytracing solutions such as V-Ray or MentalRay.

So if you want to create complex and nice looking 3D environments that can play smoothly at runtime, learning how lighting works in Unity is a must to author optimized scenes. But after reading comments on forum threads and some bug cases reported by users, I see that the official manual can sometimes fail to communicate or be overwhelming for the information user is looking for. It can also be frustrating to use it unless you are already familiar with the system. And since Unity 5.6 is still in beta-cycle, our official manual is available only in Google docs and I guess we can all agree that it doesn’t have the best layout to read. In this post, I will therefore try to clarify some concepts and terminology about light modes. For details, I will add links to relevant websites.

You can consider these posts as a compact version (guide) of the manual, essentially covering the practical aspects of light modes. I have also split the post into two sections, primarily to facilitate the reading. Part I describes the basic terminology of lighting and mixed mode (used until 5.5) and Part II explains the new light modes (Shadowmask, Distance Shadowmask and Baked Indirect) introduced in 5.6. So if you already know what mixed lighting is, you can directly skip to Part II.

In Unity 2017.1, the ability to switch between Shadowmask and Distance Shadowmask is also added and the concept of Shadowmask mode is explained in this tutorial with a realistic use case.

Lastly, I should emphasize that we are always open to feedback at Unity. Feel free to tag us, ask questions and raise your issues (or bugs) in the forum (well, as Lighting team, we are at least trying to check forums as much as possible). Also, all the statements I make here belongs to me and are my personal opinions, they are not official.

Disclaimer about User Interface
By the time this article is published, mixed lighting is still called as stationary lighting, realtime lights are called as dynamic lights and baked lights are called as static lights in the last public version of Unity 5.6. This is, however, subject to change and with the later versions of Unity, it will be reverted back to original naming. It is worth mentioning that lighting UI is still being refactored within the beta cycle.

Read more

Facial Rigging Demo – iAnimate Workshop

Game

Yorum Yapılmamış


Share this post

Last month, I have completed facial rigging workshop at iAnimate, instructed by Jonah Austin. Currently, Jonah is working as Sr. Animator at Activision but previously, he also worked on facial animations for The Curious Case of Benjamin Button, Tron and Beowulf. I had the opportunity to develop my skills and gain professional insight into technical aspects of building a robust facial rigging. Above, you can see the final result of the workshop. I have implemented all the features we learned throughout the workshop and this quick animation pass test demonstrates how blendshape interpolation works and depicts the capabilities of joint movement.

The workshop covered joint setup,  FACS system, skinning process, soft eye system, creating blendshapes, phonemes and vizemes for lip-synch, automating process (MEL and Python tips such as mirroring blendshapes) and creating UI controls to drive the blendshapes and joints. You can read the details about workshops here. If you have any questions, I would gladly reply. Leave a comment below or reach me out.

Read more

1917 – A minimalist mobile game [WIP]

Game

Yorum Yapılmamış


Share this post

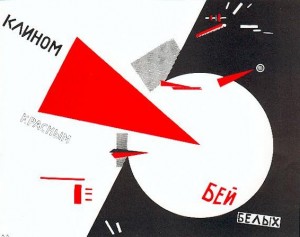
El-Lissitzky’s thought provoking composition, “Beat the Whites with Red Wedge”, was always inspirational for me. I was at high school when I first saw it. The painting was created in 1919 as a Soviet propaganda poster and I was simply impressed that so much meaning can be conveyed through the use of so little. Later on, I wondered: can we translate this composition into a gameplay?

In the composition, the red triangle represents bolsheviks, known as communists, and hints at Red Army that was established immediately after the revolution. The white circle, on the other hand, symbolizes the White movement, or described as the military army of Imperial Russia and the force that fought against bolsheviks. Besides, it is also possible to see Russian text rendered on the painting, which is the title of composition. Furthermore, this litographic painting is also an important example to illustrate constructivist art movement in Soviet Russia and it became popular in West when the artist moved to East Germany in 1921.

My passion to understand the painting has led me to work on different prototype manifestations. However, it was hard to find an idea since there were concrete constraints in terms of visual elements, colors and composition. Nevertheless, I kept experimenting.

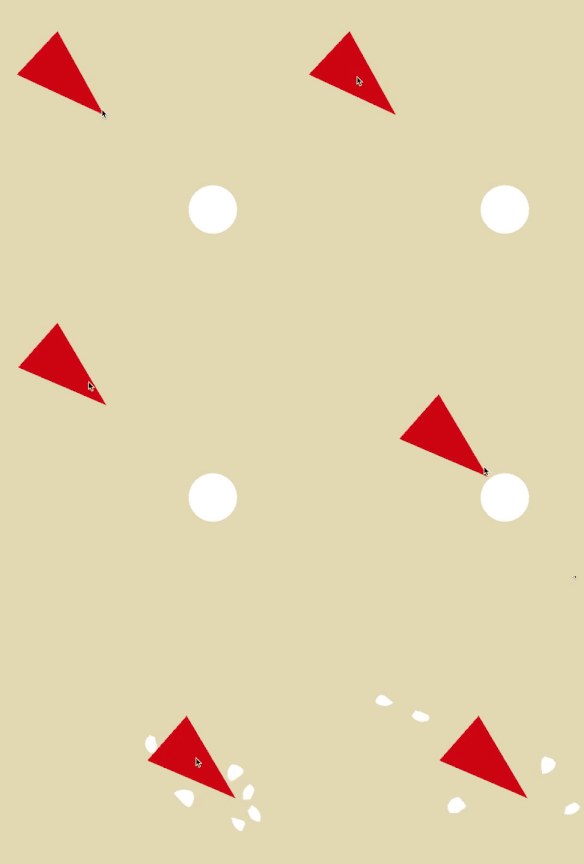
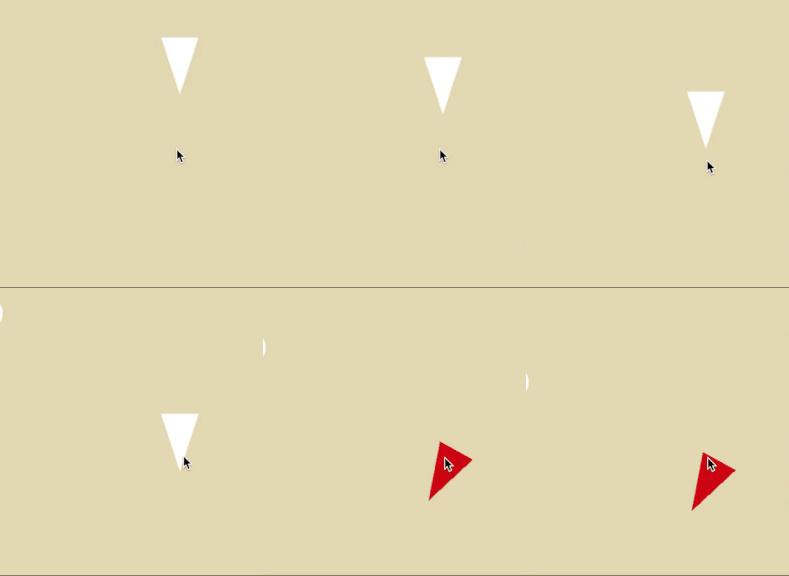
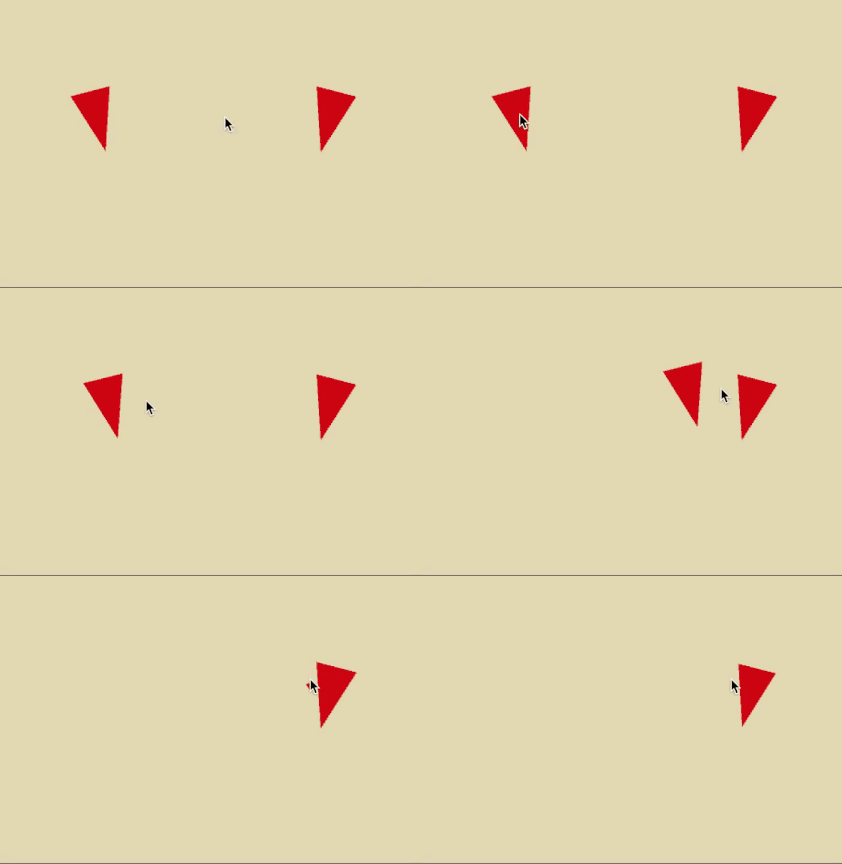
After trying out several prototypes, I think I managed to create mechanics that conveys the meaning I’m looking for. The first playable prototype, “proof of concept” is on itch.io, Right now, there are eight functional levels but due to some technical problems, I can’t show it publicly yet. However, playtests were promising and I’m looking forward to complete the game. Obviously, the most challenging part of the game is that almost nobody knows the painting, which is not necessarily a bad thing. That’s another design challenge that I try to overcome by referring to real historical events as non-diegetic elements in-between levels. The ultimate goal is to translate the experience of revolution through gameplay mechanics and inform players about relevant historical facts. And although it is playable on a computer, the final game will be released on mobile as the controls work better with touch input and in fact, there will be levels where multitouch input is required and you have to collaborate with other people to beat the game. Collaboration also fits to the concept. My objective is to complete 15 levels and release the game during summer, after handing in my thesis.  The game will be released for free on Android so expect more to come and stay tuned.  And, here is the final pitch for 1917:

“A minimalist game in which you control a triangle in order to lead a revolution


Features

Drag: Drag your Red Wedge on the screen to lead the revolution

Merge: Merge your triangle with others to recruit new comrades

Beat: Destroy the White when you are powerful

• Minimal art style: Enjoy minimalist yet functional aesthetic of 1917


Read more