In theory, it’s all good but how about using these concepts in practise? In this tutorial, we will examine a realistic use case to see how shadowmask feature can be used in a simple game scene. The scene setup will include an in-door environment and out-door environment. In-door section will use Shadowmask mode and out-door will use Distance Shadowmask mode for shadows. The scene will be very basic in order to explain how the feature can be implemented and before diving into details, let’s take a look at the overview of what we will be learning:
- Scene setup and lighting parameters
- Switching between Shadowmask and Distance Shadowmask via API
- Making local changes in lightmap parameters to get rid of banding artifacts (for soft shadows)
- Quick look at other post-processing effects for polishing
We’ll start our tutorial by adjusting the lighting parameters. For the purpose of this meaningful iteration times, we will initially dial down the default parameters. Otherwise settings can easily become an overkill even with default settings. Once we are done, we can adjust the parameters again for high quality.
You can download the necessary files for the tutorial here. You can also download the PDF version of the tutorial here.
Scene setup and lighting parameters
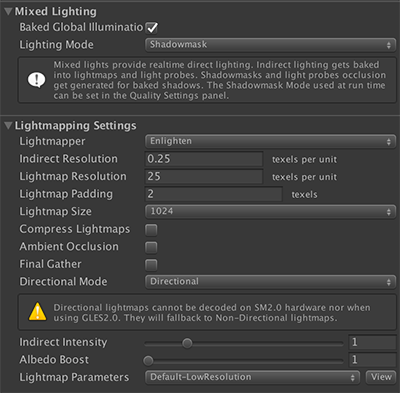
First of all, we will disable Realtime Global Illumination, we don’t need it for this tutorial. But we’ll use Baked Global Illumination and keep Shadowmask mode for lighting mode. Secondly, we will dial the indirect resolution all the way down to 0.2 and set lightmap resolution to 15. Finally, we will change Lightmap Parameters from Default-Medium to Default-Low Resolution. These settings will create some unwanted artifacts and low resolution results but in order to iterate over our scene lighting fastly, we will use these settings. Otherwise we can end up waiting for hours whenever we make a tiny change in the scene.
Next step is optional and it depends on your computer setup. By default, Auto mode is enabled in Lighting Window and it is usually useful when you’re working with a small scene. But as soon as you start to have large scenes, every tiny change you make in the scene view triggers lighting generation and slows down the editor, thus sometimes render you incapable of editing the scene. Therefore I usually disable it, make my changes and build the lighting when I’m done, after evaluating the last result. But feel free to use either approaches.
For the color space, we will use Linear space to have more accurate and deterministic colors and deferred as the rendering path. These settings are used by high-end games and in fact, if you want to have correct reflections using reflection probes and SSR, then you have to use deferred path. Currently, SSR is not supported in forward mode and reflection probes don’t display proportionally correct results unless you use deferred. With the deprecation of Directional Specular in Unity, the recommended solution is to use reflection probes and SSR. So reflections will play an important role in our scene setup, therefore we will switch to deferred rendering path.
Next, when we check the objects in our scene, we have a playable character, outdoor environment, indoor environment, colliders, sun blockers and lighting related objects.
For every type of object, I have created a new layer. Colliders are used to constrain the playable area of the level, sun blockers are used to manipulate the shadows but they are invisible to main camera. The reason why we use them is due to lac of backfaces. The geometry we use for the interior don’t have any backfaces so they don’t work as occluders and light can leak through. And since they are not rendered on the screen, we use really low quality settings for these objects. And trust me, this technique is also used in real-life production environment (well, maybe not so roughly as we do it here ![]() .
.
For the lighting, we use four different object types: A directional light, environmental lighting, reflection probes and light probes. For the sake of simplicity, we will use only one directional light as authoring artistic lighting is beyond the scope of this tutorial, we are only focusing on the technical side of shadowmask feature. And it can be tedious to setup light probes and reflection probes correctly, this is also commonly misunderstood by beginner users. Hence, we will analyse the correct approach for light probes and reflection probes. We will benefit from the new light explorer while doing the setup.
One more important point is ambient lighting. For this, we simply assign our skybox shader as part of the environmental lighting (it can be found as an asset in the project). If you examine this skybox material, you will see that it is a sIBL HDR and especially for outdoor scenes, HDR images are very helpful and provide detailed BRDF information that would otherwise be costly to recreate.
Finally, we have a character from Unity Standard Assets and a custom camera script with custom post processing and animation components attached to it.
Switching between Shadowmask and Distance Shadowmask
As explained in the previous section, we will switch the light mode from Shadowmask to Distance Shadowmask when the character goes out and vice-versa. This way, we can keep baked soft shadows in the interior environment and switch to sharp realtime shadows in the exterior environment. And perhaps to your surprise, this is very trivial. Simply, copy the script below and add it to a trigger:
Easy, right?
Making local changes in lightmap parameters
The default settings used in Unity are close to samples of a high quality project. And as explained at the beginning of the post, this can drastically increase the rendering time for large scene setups, therefore we need to adjust our settings.
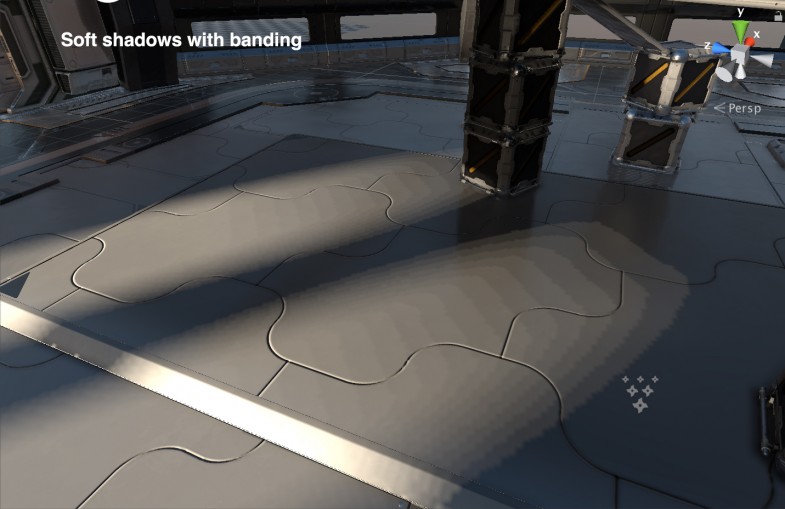
For iteration purposes, we lower the parameters but what if even default settings don’t work? In the context of shadowmask, this can typically become a problem with soft shadows. Below, you’re seeing such a case:
So how can we resolve this problem? Increase the lightmap resolution, maybe lightmap size?
Besides the lighting window, we can also tweak the parameters for specific objects. Remember that we changed Lightmap Parameters to Default-LowResolution while starting? You can actually assign custom lightmap parameters per instance and overwrite the scene settings.
First, I disable “Compress Lightmaps” option in the Lighting Window, then I created a custom lightmap parameter for the plate, and increased Blur Radius to 8 and Direct Light Quality to 128. Now let’s see how the result looks:
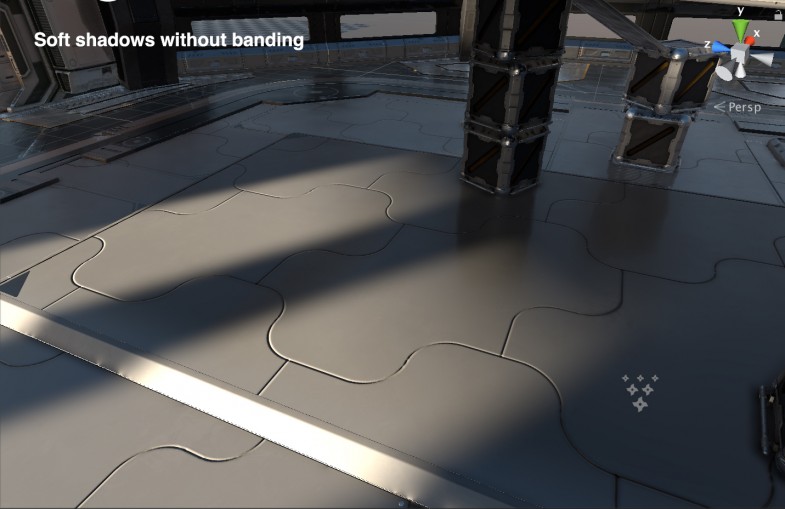
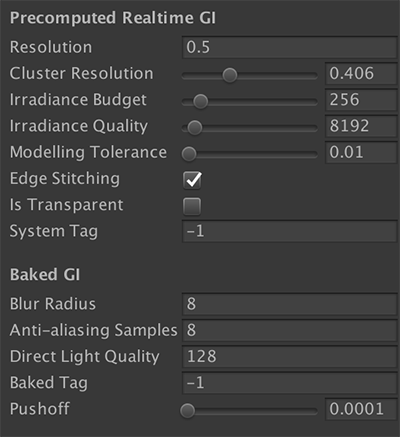
Much better, right? Furthermore, I played with Precomputed Realtime GI values for clustering optimization in Enlighten and assigned custom lightmap parameters to different objects in the scene. You can see my settings for the plate below. But the details of these parameters are beyond the scope of this tutorial, therefore we will keep going. You can check Precomputed Realtime GI tutorial in Unity3D website for more information.
Quick look at post-processing effects for polishing
Besides Screen Space Reflections, we also use TAA (Temporal Anti-aliasing), Ambient Occlusion, Color Grading, Chromatic Aberration, Grain and Vignette.
Default values of Ambient Occlusion, Chromatic Aberration, Grain and Vignette are good enough for this scene setup (ok, maybe the radius of AO can be lowered). However, we will do some additional tweaking for TAA and Color Grading.
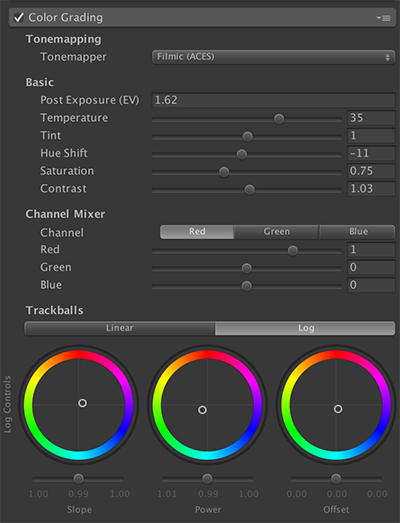
For Color Grading I used these settings in order to capture a magic hour feeling so the temperature is a bit high, other parameters are tweaked to be complementary and create a contrast with shadows:
TAA, on the other hand, is the industry’s fastest anti-aliasing solution at the moment. There is one drawback: It doesn’t work nicely with transparency and can sometimes be problematic when blending with Ambient Occlusion. Otherwise, it is a very useful effect to apply and it can make a huge difference.
In order to use it, we have to first disable MSAA from Quality Settings. So go to Edit > Project Settings > Quality and find Anti aliasing under Rendering section. Switch it to “Disabled”. Next, we have to disable it on the camera. So select your main camera in hierarchy and in inspector, find “Allow MSAA” option under Camera component. Uncheck it. We can now enable TAA. Choose the post processing profiler and enable Anti-aliasing. Switch to Temporal Anti-aliasing. You can increase spread value to avoid jittering at all cost but as a pro tip, never make it 1.0. Our test results show that ideally, it should be between 0.9 and 0.97 depending on your scene setup.
In the next post, we will explore how to correctly place light probes, reflection probes and use SSR.

Hello, thanks a lot for your tutorial series
I downloaded the example project from github, and baked the lighting of the “Completed” scene. After doing it the console is full with the same error and each time i move the camera the same error logs again:
Assertion failed: Assertion failed on expression: ‘root1 >= -epsilon || root2 >= -epsilon || root3 >= -epsilon’
Tried using different Unity Version (2017.1.0f3, 2017.2.0f3) with clean versions of the project, but the same error logs always. Any advice to solve this?